
How to Tie Fishing Line on a Reel: A Comprehensive Guide
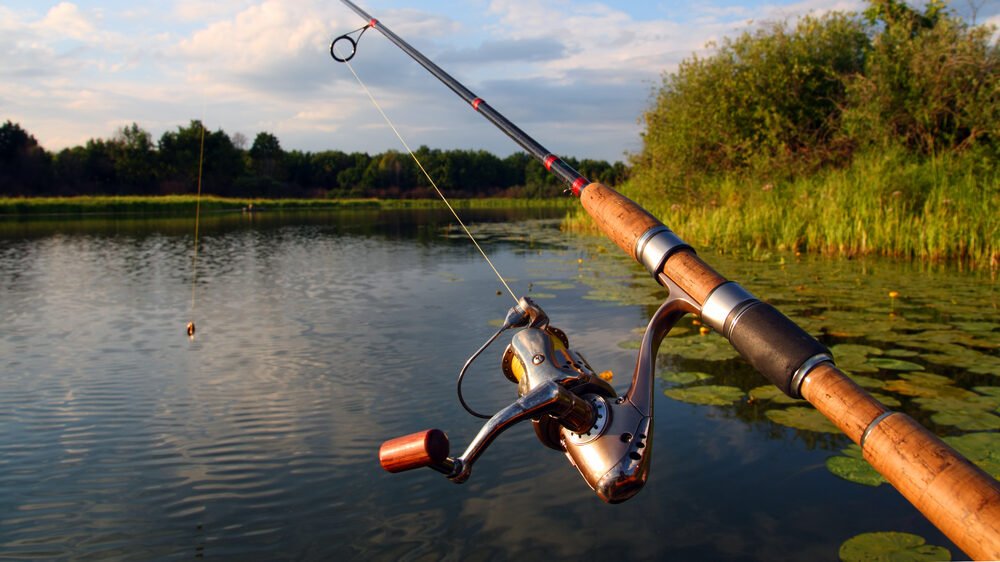
Struggling to tie the perfect knot on your fishing reel? Whether you’re using a spinning or baitcasting reel, it’s essential to have a reliable knot that won’t slip or break under pressure. In this article, we’ll teach you the best knots to attach your fishing line to your reel, expert tips for spooling, and the absolute best way of setting up your reel for a successful day of fishing.
By the end of this article, you’ll be a knot-tying pro and ready to conquer any fishing situation. Tying line to a reel will be easier than drinking milkshake through a straw. Don’t let poorly-tied knots ruin your next fishing trip – keep reading to learn the proper tying techniques from the industry pros.
Introduction to Reel Types

Are you ready to choose the perfect reel for your next fishing adventure?
When it comes to fishing, the type of reel you choose can make a big difference in your success on the water. From spinning to baitcasting to trolling, each type of reel has unique characteristics and is suited for different scenarios.
Spinning reels, also known as fixed spool reels, are the most popular choice among anglers. These reels are easy to use and suitable for many fishing situations, and the line is stored on an open spool and cast with a simple wrist flick. If you’re new to fishing or want a reliable all-around reel, a spinning reel is a great choice.
Baitcasting reels, also known as overhead reels, are preferred by more experienced anglers for their precise casting control. These reels have a closed spool perpendicular to the rod, allowing for greater casting accuracy. However, baitcasting reels can be trickier to use and require a bit of practice to master. A baitcasting reel may be the way to go if you’re a seasoned angler looking to up your casting game.
As the name suggests, trolling reels are designed for trolling lures or bait behind a moving boat. These reels have a more extensive line capacity and are built to handle a moving fish’s added pressure and weight. A trolling reel is essential if you plan on trolling for your next fishing trip.
In the following sections, we’ll delve into the proper techniques for attaching your fishing line to each type of reel, helping you cast your line like a seasoned veteran no matter which type of reel you choose.
Preparing the Reel and Line

Before you can tie your fishing line to your reel, you must ensure both the reel and line are ready for action. This section will cover the proper techniques for spooling a spinning reel and loading a baitcasting reel.
Tips for avoiding line tangles
Let’s deal with those pesky tangles!
First up, let’s tackle (pun intended) the spinning reel. Spooling a spinning reel is a simple process, but it’s essential to do it correctly to avoid line tangles and other issues.
- Attach your line to the spool by tying it on or using a backing material.
- Evenly distribute the line on the spool, leaving a bit of space between the line and the rim of the spool, which helps prevent the line from digging into the spool and causing tangles.
- Tension the line by lightly pulling on it as you spool it onto the reel, which keeps the string in place and prevents it from slipping off the spool.
How to load a baitcasting reel
Ready to transform your reel into a finely-tuned machine?
Here’s a quick step-by-step guide for spooling a spinning reel and loading a baitcasting reel, and it’s a bit more complicated than spooling a spinning reel:
- Choose the correct type of line for your bait caster. Braid and fluorocarbon lines are popular for baitcasting reels, but monofilament can also work well.
- Set the brake system on your reel to the appropriate tension to control the speed at which the line is released from the spool and prevent those annoying backlashes.
- Spool the line onto the reel, carefully distribute it evenly and leave a bit of space between the line and the rim of the spool.
Tying the Knot: Essential Knots for Attaching Line to Reel
Tying an excellent knot is the difference between a fish on your plate and going home empty-handed. Learn four fundamental knots for attaching your line to your reel, and you’ll be on your way to becoming a fishing champ.
Now that your reel is spooled and ready to go, it’s time to tie on your fishing line. There are many knots to choose from; selecting the right one is a matter of life and death (for your target fish).
This section will cover four essential knots for attaching your line to your reel: the arbor knot, double uni knot, surgeon’s knot, and slip knot.
Arbor Knot
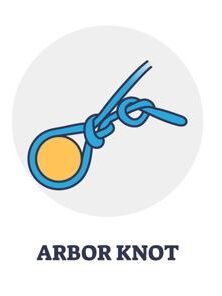
Also known as the “Bushcraft Zip Tie” or “Canadian Jam Knot,” using an arbor knot is a quick and reliable choice for attaching your line to a spinning or baitcasting reel. To tie an arbor knot, follow these steps:
- Run the end of the line through the center of the spool and tie a simple overhand knot.
- Wrap the end of the line around the spool, making several turns.
- Tie another overhand knot with the end of the line, pulling it tight against the turns you made in step 2.
- Trim the excess line, leaving a small tag end.
Pros: The arbor knot is easy to tie and provides a secure connection between the line and the spool.
Cons: The arbor knot can be bulky and may not be as strong as other knots.
Double Uni Knot
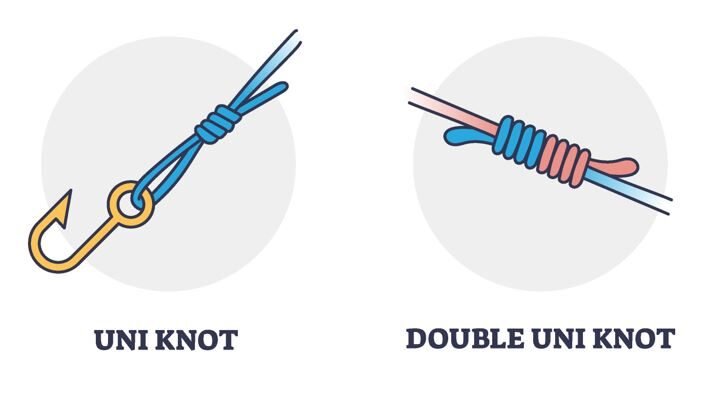
Some people may call it a “gallows knot” or “Duncan loop,” but the proper name is uni knot. A double uni knot is twice as solid and reliable for attaching your line to a spinning or baitcasting reel. Think of it as a double espresso when you’re sleepy: It does the job, but twice as reliably. To tie a double uni knot, follow these steps:
- Run the end of the line through the center of the spool and tie an overhand knot.
- Pass the end of the line through the loop formed by the overhand knot and tie another overhand knot.
- Repeat step 2, passing the end of the line through the new loop and tying another overhand knot.
- Trim the excess line cord, leaving a small tag end.
Pros: The double uni knot is strong and provides a secure connection between the line and the spool.
Cons: The double uni knot can be tricky to tie and may require a bit of practice to master.
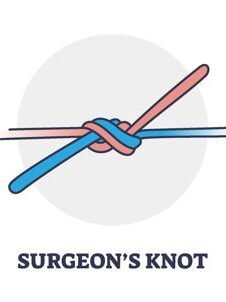
Surgeon’s Knot
Don’t worry; we won’t work with scalpels or cut flesh here.
I assume the surgeon’s knot is so good that even surgeons use it, thereby giving its name. You can consider it an upgraded reef knot and double overhand knot, and it’s popular in fly fishing and lots of other uses, such as tying raw meat. But we’ll be tying a surgeon’s knot and attaching our line to a spinning or baitcasting reel by following these steps:
- Run the end of the line through the center of the spool and tie a simple overhand knot.
- Tie another overhand knot, but pass the end of the line through the loop twice this time.
- Trim the excess line string, leaving a small tag end.
Pros: The surgeon’s knot is easy to tie and provides a secure connection between the line and the spool.
Cons: The surgeon’s knot may not be as strong as some other knots.
Slip Knot

Not to be confused with the heavy metal band Slipknot, the real Slip Knot is a stopper knot for attaching your line to a spinning or baitcasting reel. And here’s how you do it:
- Run the end of the line through the center of the spool and tie a simple overhand knot.
- Pass the end of the line through the loop formed by the overhand knot, creating a slip knot.
- Adjust the slip knot to the desired tension and trim the excess.
Pros: The slip knot is easy to tie, provides a secure connection between the line and the spool, and allows for easy line tension adjustment.
Cons: The slip knot may be weaker than others and must be retied more frequently.
Other Knots to Consider
Master these techniques and take your fishing skills to the next level. From fly fishing to braided line, these knots have you covered.
Essential knots are excellent for the basics, but other situations may require fancier knots. Let’s look at loop knots for fly fishing and tying braided lines so you can impress your friends with your newly-learned magic the next time you go fishing.
Loop Knot for Fly Fishing
The loop knot is powerful for fly fishing, allowing the fly to move more naturally in the water. Here’s how you tie a loop knot:
- Tie a simple overhand knot at the end of the line.
- Pass the end of the line through the loop formed by the overhand knot, creating a simple noose.
- Pass the end of the line through the loop a second time, creating a second noose.
- Tighten the knot by pulling on the standing line and the tag end.
- Trim the excess.
Pros: The loop knot allows the fly to move more naturally in the water, increasing the chances of a bite.
Cons: It may be weaker than others and require frequent retying to maintain it.
Knots for Attaching Braided Line to Monofilament Leader Line
Don’t let a weak knot ruin your chance of a big catch – Attach a braided line to a monofilament leader with these tried and true knots.
A monofilament leader is a strong line made of a single nylon strand with high stretch capability and looks natural in the water. When attaching a monofilament leader to a braided line, you must use a strong knot that won’t fail you when the pressure is on. Some fishermen swear to knots like the blood-, FG-, and Yucatan knots.
To tie a blood knot, follow these steps:

- Overlap the end of the monofilament leader main line and the braided line, forming a “Y” shape.
- Wrap the monofilament leader around the braided line and get many small loops.
- Repeat step 2 with the braided line, passing it over and around the monofilament leader.
- Tighten the knot by pulling on the standing lines and the tag ends.
- Trim the excess.
To tie an FG knot, follow these steps:
- Overlap the end of the monofilament leader and the braided line, forming a “Y” shape.
- Wrap the monofilament leader around the braided line several times, creating several loops.
- Pass the end of the monofilament leader through the loops and pull it tight.
- Repeat steps 2 and 3 with the braided line.
- Tighten the knot by pulling on the standing lines and the tag ends.
- Trim the excess.
To tie a Yucatan knot, follow these steps:
- Overlap the end of the monofilament leader and the braided line, forming a “Y” shape.
- Wrap the monofilament leader around the braided line several times until you have loops.
- Pass the end of the monofilament leader through the loops and pull it tight.
- Repeat steps 2 and 3 with the braided line, forming a second row of loops on top of the first.
- Tighten the knot by pulling on the standing lines and the tag ends.
- Trim the excess.
Choosing the Best Knot for Your Situation
Don’t settle for a subpar catch! Pick the correct knots for your situation so you can catch the most enormous monsters of the ocean and leave your fishing buddies speechless.
Let’s review the factors to consider when selecting the perfect knot, including line strength and diameter, reel type, and fishing situation.
Line Strength and Diameter
Imagine your knot as the foundation of a house. Just like a house needs a solid foundation to stand the test of time, your knot must withstand the strain of a hooked fish fighting for its life. I hope you see why the strength and diameter of your line matter. A weak knot will snap like a dry twig under the pressure of a fat fish, so only use knots that are up to the task when reeling in those mega fish.
The thicker your line is, the harder it is to tie, which can affect the knot’s strength. It requires more muscle power to get it right, whereas tying a knot with a thin line is a walk in the park.
Reel Type
All reels aren’t made equal and come with different strengths and weaknesses, so your reel type also matters when selecting your knot. Not all of them will be compatible with your reel, and a knot for a spinning reel may not be the best choice for a baitcasting reel.
Fishing Situation
What is the situation you are in? For example, a knot that is easy to tie may be preferred when catching small fish, while a stronger knot is better for those larger fish that will fight you until the end.
Just like a golfer needs a different club for different shots, a fisherman needs the right knot for different situations.
Finding the perfect knot is like putting together a puzzle – all the pieces must fit just right.
Frequently Asked Questions
Can I use any knot to attach my line to the reel?
Not all knots are created equal, and some may be better suited for attaching your line to the reel than others. Factors to consider when selecting a knot include line strength and diameter, reel type, and fishing situation. Choosing a knot that is strong, reliable, and compatible with your equipment and circumstances is essential.
How do I know if my knot is tied correctly?
A few critical indicators indicate that your knot is tied correctly. First, the knot should be tight and secure, with no looseness or slack. Second, the knot should lay flat and smooth against the line, with no bulges or twists. Finally, the knot should hold up to moderate strain – try gently pulling on the standing line to test the knot’s strength. If the knot holds, it’s likely tied correctly.
Is it better to use a braided or monofilament line?
The choice between braided and monofilament lines depends on your fishing situation’s specific needs. A braided line is often more durable and has a higher tensile strength, making it a good choice for targeting larger fish or when extra power is needed. On the other hand, the monofilament line is more flexible. It has a more natural presentation in the water, making it a good choice for finesse fishing or when a more subtle approach is needed.
Can I use the same knot for spinning and baitcasting reels?
While some fishing knots may work well with both spinning and baitcasting reels, it’s essential to consider each type of reel’s specific requirements and capabilities. For example, a knot that works well with a spinning reel may not be the best choice for a baitcasting reel. It’s always a good idea to consider the specific needs of your reel spool when selecting a knot to tie.
How do I fix a line tangled on the reel?
If your line becomes tangled on the reel, the first step is to stop reeling and carefully loosen the string to release the tangle. Once the jam is fixed, you may need to cut away any damaged or frayed line sections. Finally, reattach the line to the reel using a strong knot.
Conclusion
Don’t let tangled lines ruin your fishing fun – You have the secrets to reel in the big catches.
Well, that’s it – you can now consider yourself a knot-tying pro! With the knowledge you’ve gained in this article, you’ll be able to tie the perfect knot for any fishing situation, and I’ll bet the rod will break before the knot comes apart.
Also, remember that practice makes perfect, so consider being a knot-tying apprentice for a while and experiment with different types until you awaken the full force within you and become the Jedi master capable of tying knots 100% intuitively.
If all else fails, remember – if you can’t tie a knot, you can always just tie a shoestring and call it a day and go watch Youtube. Happy fishing!